I’m excited to help Allison spread the homemade-backpacking-food gospel, and share one of my absolute favorite backcountry meals with my chili and quinoa recipe!
When I got into backpacking, and starting exploring the pre-packaged offerings of dehydrated meals that were on the market, I made the decision pretty quickly to start making my own at home. I didn’t want meals full of preservatives and ingredients I couldn’t pronounce, I knew I could save a boat-load of money, and mostly – eating food on the trail that you love eating at home is super comforting. Some of the best advice that was given to me early on was to take recipes you already enjoyed and just dehydrate them - and that advice worked brilliantly!
More than a Calorie
I’m passionate about eating nutrient-dense, plant–based, whole foods on and off the trail – as our bodies require good fuel for long days of hiking. There’s so much more to backpacking nutrition than the calorie-counting we always hear about – a calorie is not just a calorie! When developing the recipes for my backpacking meals, I tried to come up with meals that were super calorie-dense, nutrient-rich, full of protein, and most importantly – that tasted good.
This chili has proven to be the star of my backcountry dehydrated meals. It’s full of flavor (which is so important on the trail), it’s super filling and satisfying, and it’s full of nothing but nutrition. It also rehydrates easily and quickly!
The Recipe - Three Bean Chili with Quinoa
This recipe is for a 6 quart slow cooker – but can be halved to fit in a 3 quart
1 tbsp olive oil
4 large Portobello mushrooms cut into ½ inch squares
2 onions, finely chopped
4 carrots, diced
4 stalks celery, diced
4 cloves garlic, minced
2 tbsp chili powder
1 tbsp dried oregano
1 tbsp ground cumin
2 tsp salt
1 tsp back pepper
1 can (28 oz) diced tomatoes, including juice
3 cups vegetable stock
1 can (14 oz) white kidney (or cannellini) beans, drained and rinsed
1 can (14 oz) red kidney beans, drained and rinsed
1 can (14 oz) chickpeas, drained and rinsed
1-2 jalapenos, finely chopped (seeded for less heat)
1 cup quinoa
1. Place cut mushrooms in the slow cooker.
2. Heat the olive oil in a large skillet over medium heat.
3. Add onions, carrots, and celery and cook , stirring, until the veggies are all softened, for about 7 minutes.
4. Add the garlic, spices, salt and pepper and cook, stirring for 1 minute.
5. Add the can of tomatoes, and bring to a boil.
6. Turn off the heat and pour it all into the slow cooker over the mushrooms.
7. Add the vegetable stock, and all of the beans, stir to combine.
8. Cover and cook on Low for 8-10 hours, or on High for 4-5 hours.
9. Stir in the quinoa and jalapeno, and cook for another 30 minutes.
Variations: Make this chili your own! Add zucchini, bell pepper, or any other veggies you have on hand (just make sure your slow cooker isn’t going to overflow!). TVP or bulgur can be substituted for the quinoa - both are super-high in protein and will also add a ‘meaty’ texture. Wanna get fancy? Throw in some turmeric with the spices to help with inflammation after a long day of walking – it’s a natural vitamin-I (and won’t change the taste)!
When it’s done cooking..
Once the chili is done, you can do what I usually do – eat a huge bowl of it right away – or just go right to the dehydrating!
1. Measure: Measure exactly how much chili you’re starting with before you dehydrate it and write it down. You will need this amount later when you need to figure out how much water you’ll need to rehydrate.
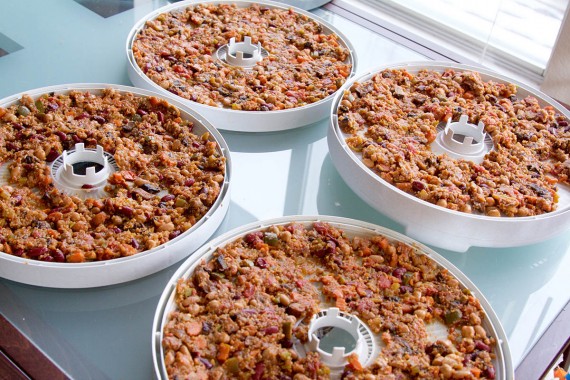
2. Dump it in the dehydrator: I have a pretty basic model, and I’ve purchased additional trays and liners so I can dehydrate more at once. You may need to do this in two batches depending on the size of your machine. I use soup liners on my trays (‘fruit roll-up’ trays or even parchment paper works) when I dehydrate stews and chilis– because otherwise the liquid will just fall through the trays. Tip: spread the chili out thin (even if you need to do it in two batches) – the thicker it’s spread, the longer it will take to dehydrate.
3. Walk away! I set the temp on my dehydrator for 135-140 degrees, put it down in my basement, and check it later that day (anywhere from 6-8 hours later). Whenever I check on it, I bring a spoon with me and stir each tray so they dry more consistently. Depending on where you live and your climate, what model dehydrator you have, how thick or thin you spread out the chili – the full drying time will totally vary. Mine has taken anywhere from 12-20 hours total. It is done when it is completely and totally dry. If you’re not sure – err on the side of drying it longer.
4. Measure it again: You wrote down how much you had before you dehydrated, right? Right?? Go find that piece of paper. Now measure how much you have now that it’s dry, and write that number down. Subtract the difference between the two numbers– and that number is the amount of water you will need to rehydrate it later. Write it down.
5. Figure out your meal portions: I tend eat 3-4 cups of food per meal (hydrated). Usually this chili makes around 16 cups, so I end up with 4 meal portions.
a. Divide the dried chili into however many portions will make you
b. Divide the amount of water (from above) by your number of portions.
c. Magically you now have the amount of water you will need to boil and happy, and full, after a full day of walking. add to each meal to
rehydrate it. Write it down.
6. Ziploc bags for all! Grab a sharpie and enough Quart-sizes Ziploc Freezer bags for all of your meal portions. Label each bag with the recipe name, date, and amount of water. Dump in the dried chili, seal them up and store them in a cool, dry, place until you’re ready to use! (I like to keep mine in the back of my fridge if it’s going to be over a month before I will use them – they should keep for many many months in the fridge).
A few tips:
Eating a bowl of a recipe first is an awesome way to find out how much of it will fill you up and leave you satisfied. If you eat a bowl, measure how much you ate and write that down – that same portion-size should leave you pretty happy in the wilderness.
Oils and fats do not dehydrate well – oils will go rancid in a dehydrator; so don’t add more oil to this recipe. However, the small amount of oil in this recipe is totally fine.
Water amounts and re-hydration times can totally vary. The higher in elevation or drier the climate may require more water and a longer hydration time. With this chili I err on the side of more water if I’m in the mountains – it’s better if it ends up a litter soupy rather than crunchy! I’ve found that most meals with beans take about 10-15 minutes to rehydrate.
This post was contributed by Erica Ruch. She is a hiker, designer, and plant-eater currently living in Colorado, you can follow her adventures at thoughtfullyawesome.com
All images copyright © Erica Ruch
Last modified: December 17, 2015


2 Responses to :
Three Bean Chili and Quinoa Recipe